Introduction
In my last post, I showed how to host a WCF Service in an Azure Web Role with http and tcp endpoints. In this post, I will wrap things up by showing how to secure these endpoints using a self-signed certificate that can be used for TLS/SSL during development and testing.
Before I can start to update the application, there are a few necessary steps:
- Create a Self-Signed Root Authority Certificate (CA). This is generally something you only want to do once. For example, when you’re setting up your development environment for the first time. Once you have a root certificate authority (CA), you can use it to issue additional test certificates signed by this CA. When I create a new development machine, this is one of the first things I typically do.
- Create a Test Certificate using the Self-Signed Root CA. This is generally something you do for each application (or service in this case). The reason is that you want the subject of the certificate set to the URL of the application so you don’t get certificate trust errors (red bar in IE for example).
- Upload the Test Certificate to your Cloud Service. This is necessary if you intend to publish your cloud service from Visual Studio. If the SSL Certificate for your https input endpoint doesn’t already exist in your cloud service, then Visual Studio will raise an error instructing you to first upload the certificate (.pfx) file to your cloud service.
Much has been written about each of these steps, and you can achieve each by following the instructions here and here. Just reading all of this will take you several minutes and will navigate you through command prompts and Windows Azure Portal experiences to complete the task. Alternatively, you can do it all in about 30 seconds with this handy little (PowerShell script)[https://github.com/rickrain/WCF-In-Azure-WebRole/blob/master/New-CloudServiceSSLCert.ps1] I wrote.
The script requires that you have the Azure PowerShell Cmdlets installed and also have a Default Azure Subscription configured for the Azure PowerShell Cmdlets.
Now, let’s get started…
Run the script to do all that stuff up there for me!
The script is thoroughly documented so I’ll leave it to you to review the details on what it does.
To run the script, you just need to edit a couple of variables at the very top, specifically the caSubjectName and the serviceName. Optionally, you can change the serviceLocation to an Azure data center location closer to you. Finally, you may also need to adjust the path to makecert.exe for your machine by updating the makeCertPath. I am using the PowerShell ISE to edit and run the script as I write this.
Note: You must run PowerShell (or PowerShell ISE) as an Administrator for this script to run.

Click the Save button and then the Play button to run the script and you’re on your way.
Here is the output when I ran it on my machine. Notice the very last line where it prints out the thumbprint to use to configure the https input endpoint for my Web Role. I’ll come back to this a little later.

Although the output is pretty clear what just took place, here is some visual evidence to illustrate what this script just did.
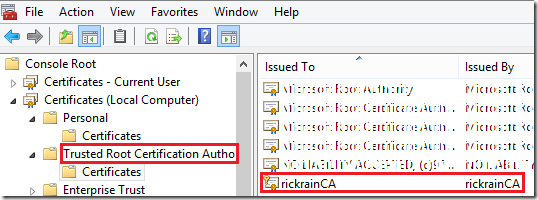
It created a self-signed root authority certificate and placed it in the Cert:\LocalMachine\Root store.
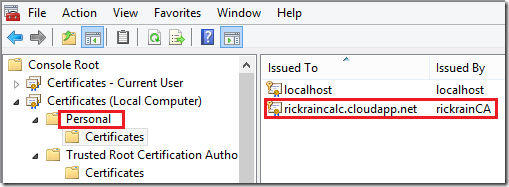
It created a test certificate issued by the self-signed root CA and placed it in the Cert:\LocalMachine\My store.
It created a new cloud service for my application since one didn’t already exist.

It uploaded the certificate that I will use for SSL to the certificates section in Azure for my cloud service.

Now that that’s all done, I can move onto the application changes needed to secure these endpoints.
Configure Web Role Endpoints
The first thing is to add the test certificate to the Certificates tab in the Web Role properties. I named mine “SSL Cert”.
The thumbprint should match the thumbprint that the PowerShell script printed out earlier.

Next, change the http endpoint to use https, port 443, and specify the SSL Certificate Name from the previous step.

The tcp endpoint doesn’t require any changes here. Instead, the necessary changes are added in the WCF configuration to secure the netTcpBinding. This is because of how transport security in WCF works when using the netTcpBinding. I’ll get to that in the next section.
Secure the WCF Endpoints in Web.Config
The differences in the web.config for the Web Role between this post and the last one are highlighted and annotated here. There are no code changes needed. Just update the configuration as I’ve shown here.

That’s all there is to it. Build and publish the service and you are ready to consume it from a client application.
Test The Service
To test the service, I’ll go back to using the WCF Test Client because I want to highlight a problem I see many people running into.
When you run the WCF Test Client with these secure endpoints, you will see an error when you try and consume the service over the tcp endpoint (http will work just fine). The error message is actually pretty helpful though.

It is true that WCF’s transport security and the WCF Test Client are a bit stricter when it comes to insuring proper security is applied. This is a good thing (but can be frustrating at times). It turns out that self-signed certificates created using makecert.exe don’t have a certificate revocation list (CRL). Since there is not one, the WCF Test Client is complaining because by default, it wants to check the CRL before establishing the connection. So, how do you fix this so you can still use the WCF Test Client?
In the WCF Test Client, you can edit the config file that the test client generated. Simply right-click on the Config File node and select the option Edit with SvcConfigEditor.

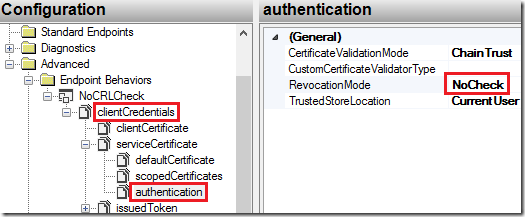
| Add an Endpoint Behavior ( I named mine NoCRLCheck ). For the behavior, add a clientCredentials element, navigate to the **serviceCertificate | authentication** node and change the RevocationMode to NoCheck. |
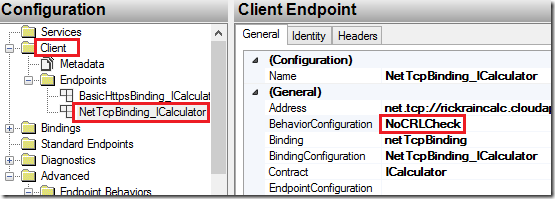
Next, wire-up the endpoint behavior to the client tcp endpoint.
Save and close the WCF Service Configuration Editor. When you do, the WCF Test Client will detect there was a change and prompt you to reload the service with these new settings. Click on Yes.
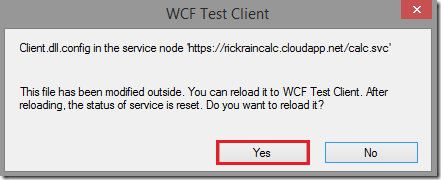
With this configuration, we’re simply telling the WCF Test Client not to bother checking the CRL for this service. After all, it is just a test client!
Now you will be able successfully call the service securely over http and tcp using the WCF Test Client.
Remove the Test Certificate
When you are finished with your cloud service development and want to remove the test certificate from your certificate store, here is some handy PowerShell to do the job. Just change [YOUR SERVICENAME] to match your cloud service name. This will run the script in “What If” mode (not making any changes) so you can see the certificates it will remove. To have it actually remove the certificates remove the –Whatif switch and run it again.
1
2
3
Get-ChildItem -Path Cert:LocalMachineMy -Recurse |
    Where-Object { $_.Subject -eq "CN=[YOUR SERVICENAME].cloudapp.net" } |
    Remove-Item -Verbose -WhatIf
This does not remove the self-signed CA certificate. Again, you probably want to leave the self-signed CA on your machine so you can run the script again for another cloud service project and generate new test certificates as needed. The script will re-use your self-signed CA certificate if it finds one.
My full solution (and this new script) are available here.

Comments powered by Disqus.