
Introduction
Since IIS 7.5, developers have been able to take advantage of the rich hosting environment IIS provides for their WCF services, and do so using non-http protocols, such as net.tcp, net.pipe (for x-process calls), and net.msmq (for queuing). For many, it was this release that removed the ball-and-chain of writing and maintaining a self-hosted WCF service host just to leverage non-http protocols. Extending this concept to the cloud and hosting your WCF service in an Azure Web Role allows you to continue to benefit from the great hosting features in IIS. It is a very simple task, if you just stick with the defaults (http). Add support for tcp and things can start to get a bit tricky.
In this post, I’m going to walk through the steps to host a WCF service in an Azure Web Role that supports both http and tcp protocols. I will also share my approach to web service development along the way.
Create a WCF Service Library
I prefer to start just about any WCF service using the WCF Service Library template.

There are a few reasons for this…
- The project is configured to leverage the WCFServiceHost. This frees me from having to provide a host process of my own. If you’ve done WCF development for a while, you probably remember the days of the console host application you had to write just so you could test your service. Sadly, many of those samples are still around today. I don’t like these because they just take away from what is strategic, which is, developing the service!
- The project is configured to launch the WCFTestClient. This frees me from having to provide a client application of my own just to test the functionality of my service. Again, not strategic to what I’m trying to do.
- Finally, and this is the most important, the project makes absolutely no assumption about how the service will be hosted. I can reference this DLL from any host process I choose (IIS, a Windows Service, COM+, etc.) and that host can be on-premise or in the cloud.
As a result, I spend my time focusing on just the implementation of my service. Once I’m satisfied with my implementation, I can shift my attention to the tasks needed to host it.
For this blog post, I used the WCF Service Library template to create a calculator service. I’m not going to go into the details here because this is a very trivial step and not the focus of this post. It literally took about 60 seconds and I was up and running. If you’re reading this I’m assuming you know the basics of creating a WCF service. My full solution is also available at the end of this post for download.
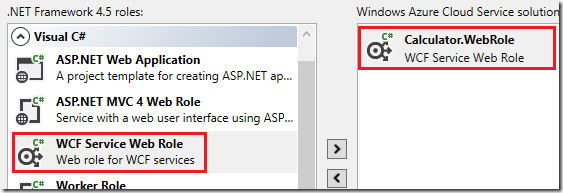
Create a Cloud Service using the WCF Service Web Role
My calculator service needs a host process and since I’m going to host this service in Azure, I used the WCF Service Web Role template for my new Cloud Service project.
Using this template assumes you will be using IIS as your host. This is recommended because of all the features that IIS makes available to you out of the box. Again, what is strategic for me is not creating a service host but instead making my service (from the previous section) available to clients or other applications. In other words, I’m simply leveraging as many features of the platform as possible so I don’t have to maintain unnecessary code.
When Visual Studio creates the WCF Service Web Role project, it provides a fully functional service you can use to start your development from. Since I already have a service though I deleted these files from the project.

Even if I were planning to start my development from this template, I always delete these files because I don’t like the physical .svc file that has just one line of markup in it. This .svc file (the extension actually) is significant though because it is what IIS uses to activate the service. So, removing it means I need to handle this another way, which I’ll get to shortly.
The main issue I have with the .svc file though is this. If you decide to add more services to your Web Role, then you would end up with more .svc files in your virtual directory. Imagine what your virtual directory in IIS would look like if you had hundreds of services. You guessed it – you would have hundreds of .svc files (each with just one line of markup in it).
There is a better way to handle activation of your service that will free your virtual directory from the clutter of .svc files. And if your going to run your service on-premise or in an IaaS Virtual Machine in Azure, your IT Professional will appreciate not having all these files in the directory too!
To achieve this, I just need to do three simple things:
- Add a project reference (not a service reference) to my WebRole referencing the WCF Service Library from the previous section.
- Build the solution so the DLL for my WCF Service Library (referenced in #1) is in the output directory of my Web Role.
- Add a serviceActivation to the configuration (web.config) for the Web Role. The Relative Address can be anything, just as long as it ends with “.svc”. Again, this is because IIS uses this to broker in the correct handlers for WCF. The Service is the service type from the WCF Service Library. That is, the class that implements the service contract.

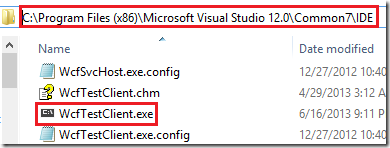
That’s it. Now, I can build and publish the solution to Azure. To interact with the service, I prefer to continue using the WCFTestClient that I used during the development of the service. In fact, I just keep it on my task bar for easy access to just about any service I want to test. Here is where it is located on a Visual Studio 2013 installation.
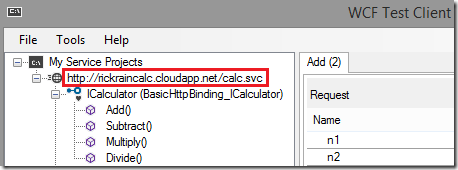
To consume the service, open the service using the public address of the cloud service and append the relative address from the serviceActivation configured earlier and you’re up and running.
Provision the Virtual Machine to Support TCP
When you host your service in IIS, your service is accessed through the base addresses the environment has provisioned . By default, there is only one base address, and it uses http . So, the base address for your service is http://[yourservicename].cloudapp.net/calc.svc . If you want to support tcp, then you need to provision the environment so that IIS offers a base address for it. When you do, you will automatically have a base address for that protocol, such as net.tcp://[yourservicename].cloudapp.net/calc.svc .
To provision the server so that IIS support TCP requires some server configuration changes. There is plenty of documentation showing how to install and configure non-http activation on a server. But, when you’re deploying your service to Azure, you need to automate this.
To automate this step, I added a Startup folder to my Web Role project with two files.
- A Startup.cmd that I’ll run as a startup task when the virtual machine is being provisioned.
- A PowerShell script, RoleStart.ps1, that I’ll run from the OnStart method in my Web Role.
The reason for not putting all this in a single startup task is explained here .

Startup.cmd
1
Powershell.exe -command "Set-ExecutionPolicy -ExecutionPolicy Unrestricted" >> startup_log.txt
This will get executed as a startup task. All it does is set the execution policy to Unrestricted so I can run the RoleStart.ps1 later in the OnStart method.
RoleStartup.ps1
1
2
3
4
5
6
7
8
9
10
11
12
13
14
# Install TCP Activation to support netTcpBinding.
Import-Module ServerManager
Install-WindowsFeature -Name AS-TCP-Activation

# Add TCP to site bindings.
# Assume the fist website is for my WebRole.
Import-Module WebAdministration
$site = Get-WebSite | Select-Object -First(1)
Set-Alias appcmd $env:windir\system32\inetsrv\appcmd.exe
appcmd set site ""$site.Name"" "-+bindings.[protocol='net.tcp',bindingInformation='808:*']"

# Enable net.tcp on protocol.
$appName = $site.Name + "/"
appcmd set app $appName "/enabledProtocols:http,net.tcp"
This script provisions the server to install the TCP Activation Windows feature, add TCP site bindings in IIS, and then enable net.tcp on the site. It will get executed from the OnStart method when the Web Role is starting which I’ll get to shortly.
A word of caution regarding these two files. They need to be saved using codepage 65001 instead of the default 1252. Otherwise, they will fail because of some encoding discrepancies at the beginning of the file. To do this, select File –> Advanced Save Options if/when you edit these in Visual Studio.

The next step is to edit the service definition (.csdef) file. Here, I’ll make two changes:
Set the executionContext in for the Runtime to elevated. This is because I’m going to be invoking the RoleStart.ps1 PowerShell script in my OnStart method. Since that script will be making server configuration changes, the Web Role needs to be elevated for that to be successful.
Add a Startup Task to invoke the Startup.cmd during the virtual machine provisioning process.

WebRole.cs
Finally, the last part of the provisioning process is to invoke the RoleStart.ps1 PowerShell script in the OnStart method. Here is the snippet of code that starts a new PowerShell process and invokes the script.
1
2
3
4
5
6
7
8
9
10
11
12
13
var startInfo = new ProcessStartInfo()
{
    FileName = "powershell.exe",
    Arguments = @"..\Startup\RoleStart.ps1",
    RedirectStandardOutput = true,
    UseShellExecute = false
};

var writer = new StreamWriter("out.txt");
var process = Process.Start(startInfo);
process.WaitForExit();
writer.Write(process.StandardOutput.ReadToEnd());
writer.Close();
Configure the WCF Service Web Role to use TCP
There are just a few configuration changes that need to be added to the WCF Service to round this out. The first is to add the useRequestHeadersForMetadataAddress Service behavior and defaultPort property setting for net.tcp. The port is 808, which is the port used in the RoleStart.ps1 script to configure site bindings for net.tcp. This will make your service work behind the Azure load balancer.
http://support.microsoft.com/kb/971842

Next, I’m going to disable security on the netTcpBinding. By default, it uses Transport Security. Since my http endpoint is also not secure (yet), I’m just disabling it for tcp as well. In a follow-up post, I’ll cover the steps to secure these two endpoints.

With the netTcpBinding configuration taken care of, the next step is to wire this up to the ProtocolMapping for net.tcp.

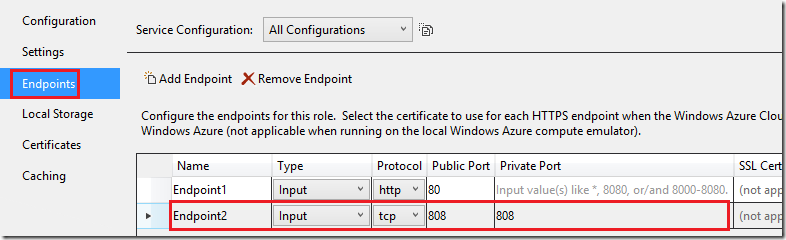
Add a TCP Endpoint to the Cloud Service
The last part is to add a new input endpoint to the cloud service project.
Now, build and publish the solution and you will have a WCF Service running in a Web Role accessible through either http or tcp endpoints.
Test the Cloud Service
Using the WCFTestClient again to test the service, I now have two endpoints; one using http and another using tcp.

Conclusion
In this post I showed how to host a WCF Service in an Azure Web Role with support for http and tcp protocols. I also covered some of my personal best practices on how to build your WCF service to accommodate various hosting options.
As always, my full source code is available here.
Comments powered by Disqus.