At the end of the last post I closed by mentioning how the Azure AD Graph API and the IsMemberOf function could be used to determine a user’s membership in Azure AD Groups. However, as you saw in the last post, the group claims feature recently added to Azure AD made that task extremely simple without needing to use the Graph API. Still, there are many application scenarios where the Graph API is very useful and so it is the purpose of this post to formally introduce you to the Azure AD Graph API and introduce some handy client libraries you can use to access the Graph API.
Introduction to the Azure Active Directory Graph API
Azure Active Directory provides a Graph API for every tenant that can be used to programmatically access the directory. So, if you have an Azure Subscription then the Azure AD Graph API is already there for you to use. Using the Graph API, you can do things such as query the directory to discover users, groups, and relationships between users. You can also use the Graph API to make changes to the directory such as adding, deleting, and updating users. In other words, the Graph API gives you CRUD capabilities when accessing the graph. And while my simple introduction is in the context of users and groups, don’t assume those as limitations for the Graph API. It is far more reaching than this and can be used to access virtually any entity in the directory.
Like many other services in Azure, the Graph API is a REST API so programming against it is easy for any web developer using any language. For .NET developers, you could use the Microsoft Http Client Libraries to construct your REST calls to the Graph API. When available, I prefer to use client libraries that take care of invoking the REST API’s for me and Microsoft provides the .NET Azure AD Graph Client Library that does exactly that.
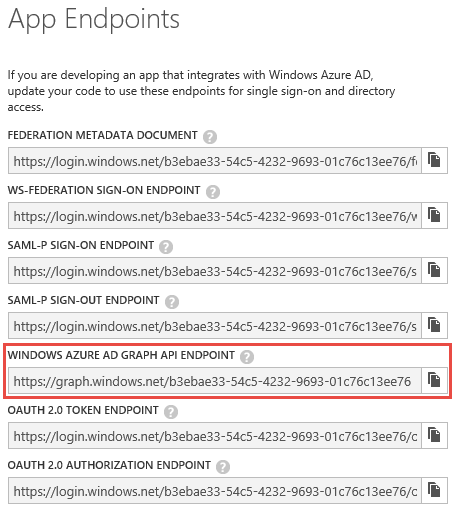
The Graph API endpoint for your directory will be https://graph.windows.net/[YOUR TENANT ID]. If you have a custom domain configured for your directory then you could use that in place of your tenant ID. For example, either of the following endpoints are valid for my directory with a custom domain of cloudalloc.com.
- https://graph.windows.net/b3ebae33-54c5-4232-9693-01c76c13ee76
- https://graph.windows.net/cloudalloc.com
You can find your Graph API endpoint using the Azure Management portal by clicking on the VIEW ENDPOINTS button at the bottom of the APPLICATIONS page for your directory as shown here.

This will open a window showing all the application endpoints for your directory as shown below. Note: Even if you have a custom domain configured, this screen will show your endpoints using your tenant ID. But, you can exchange the tenant ID for your custom domain when accessing these endpoints in your code as you will see me do later in this post.
At this point, we have a basic understanding of what the Graph API could be used for, where to access it, and some libraries that can be used to build applications using the Graph API. In the remainder of this post I will demonstrate using the .NET Azure AD Graph API Library and ADAL to implement some scenarios that are made possible via the graph.
Develop a Client Application for the Azure AD Graph API
For this post, I’m going to break away from the sample and scenarios of previous posts in this series and create a new application so you can see all the steps from beginning to end in one post. So, let’s get started.
My application is going to be a very simple console application. Doesn’t get any simpler than that! The application is going to access the Graph API and perform a few simple operations.
Register a New Application in Azure AD
The first step is to register an application in Azure AD. This is done in the APPLICATIONS page of your directory in the Azure Management Portal. Click on the ADD button at the bottom of the page to proceed through the new application wizard.
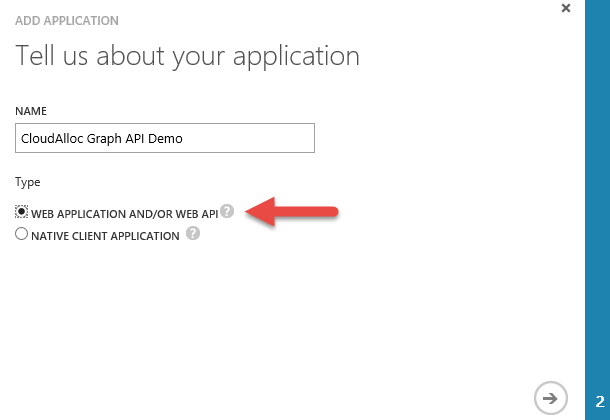
The first page of the wizard as shown in Figure 3 needs a name for my application and the type of application it is. For this application, even though it is a console application, I am choosing the Web Application and/or Web API type. The reason I’m doing this is because I want my application to authenticate using application credentials rather than prompting the user running the application to authenticate with his/her username and password.
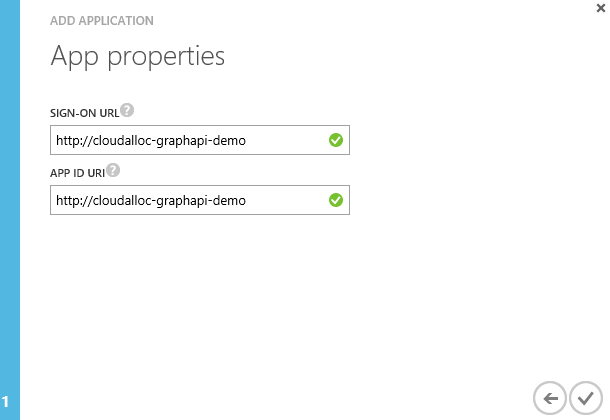
Since I chose the Web Application/Web API application type, the next page in the wizard needs a valid sign-in URL and application ID URI. Since this is not really a web application any values will work as long as they are valid URL’s and URI’s as shown here.
That completes the application registration part. Now I need to make a couple of configuration changes which I’ll do in the next section.
Configure the Application to Access the Azure AD Graph
The configuration changes I need to make can be done in the CONFIGURE page for the application I registered using the Azure Management Portal. Shortly I’ll be getting into the code of the application and when I do there will be two pieces of information that I’m going to need. The first is the CLIENT ID which Azure AD generated for me when the application was registered. The other is a KEY (or secret) that I need to generate for my application so it can access the graph. Both of these are shown below. Pay attention to the message in the portal when you generate your key. As soon as you save the configuration change you will be able to see the key and copy it. After that, you will never be able to see it again so be sure to copy it before leaving the page. Otherwise, you will have to re-generate a new key. Also, notice that you can create multiple keys. This is to support key rollover scenarios. For example, as your key approaches expiration you can create a new key, update and deploy your code with the new key, and then remove the old key.

A little further down in the permissions to other applications section, I am adding an Application Permission indicating this application can Read and write directory data as shown below. This will allow my application to query the directory and make changes to it such as adding new users.
NOTE: It has been my experience that changes to permissions (application or delegated as shown above) generally take about 5 minutes to take effect. So for example, let’s assume I forgot to add the application permission above, built my application, and then realized my application didn’t have the required permissions to read the graph when I ran it. It’s a simple fix to come back here and add the permission. Just be aware that there is this delay. Otherwise, you may do like I did and start applying other unnecessary changes to try and get it working. Just be patient.
Now, with these configuration changes saved, I’m ready to transition into the coding of this application.
Create a new Console Application using Visual Studio
After creating my new Console Application in Visual Studio, the first thing I want to do is bring in the client libraries that I’ll be using to access the graph in my directory. Both are available as NuGet packages and are as follows:
- Active Directory Authentication Library (ADAL), v2.14.201151115
- Azure Active Directory Graph Client Library, v2.05
Add Configuration Settings
The first thing I’m going to do is bring in some settings from Azure AD and configuration from the application I just registered in my directory. I’ll need this information for authenticating to Azure AD and accessing the graph.
1
2
3
4
5
6
7
8
9
10
11
12
13
14
// This is the URL the application will authenticate at.
const string authString = "https://login.windows.net/cloudalloc.com";

// These are the credentials the application will present during authentication
// and were retrieved from the Azure Management Portal.
// *** Don't even try to use these - they have been deleted.
const string clientID = "07e33f8a-166f-4d79-a46d-f96dccf08b76";
const string clientSecret = "s9e6moGcFsRPP0rENcniLIi3q1hgmpGCUJUrpSIenvY=";

// The Azure AD Graph API is the "resource" we're going to request access to.
const string resAzureGraphAPI = "https://graph.windows.net";

// The Azure AD Graph API for my directory is available at this URL.
const string serviceRootURL = "https://graph.windows.net/cloudalloc.com";
The settings in this code may look familiar. For example, the authString, resAzureGraphAPI and the serviceRootURL are simply from the App Endpoints dialog in Figure 2 above. The clientID and clientSecret were generated when registering the application as referenced in Figure 5 above and it is these two settings that will be used to generate a ClientCredential for authenticating to Azure AD later in this post. And while I’m talking about keys understand that it is not a best practice to store keys like this in code. I am showing it here out of convenience for this blog post. I suggest you be mindful of best practices for deploying passwords and other sensitive data to ASP.NET and Azure Websites for your own applications.
Instantiate ActiveDirectoryClient from the Azure AD Graph Client Library
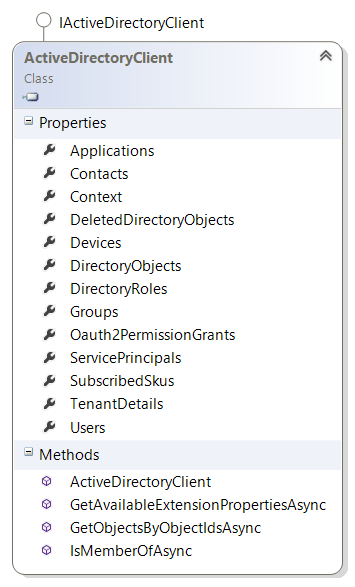
The Azure Active Directory Graph Client Library provides a class called the ActiveDirectoryClient that is used to access all the properties available to you in the graph, such as users, groups, contacts, the applications you have registered, and much more. As shown below, there are several properties hanging off of it to work with the various entities in your directory. The list of methods is brief and you will notice the IsMemberOfAsync that I talked about in previous posts as an alternative way to determine if a user is in a particular group.
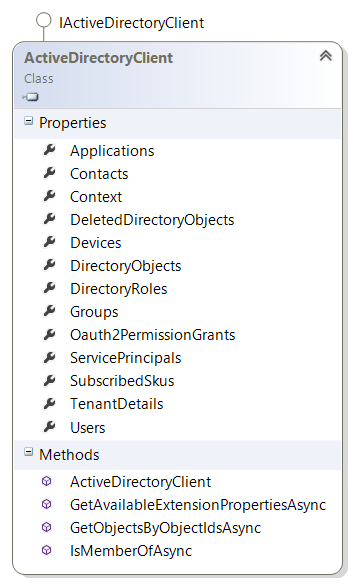
So, let’s begin this journey by looking at what it takes to instantiate an instance of this class. The constructor is shown below and I’m sure you will agree this it has a signature that is not your typical method signature. In particular, notice the 2nd parameter that I’ve highlighted. What you are required to provide here is a method that will acquire a token from Azure AD. Simple, right? Actually it is but at first glance this is a little intimidating.
1
2
3
public ActiveDirectoryClient(Uri serviceRoot,
     Func<Task<string>> accessTokenGetter,
     IEnumerable<CustomTypeMapping> customTypeMappings = null);
Here is how I am instantiating an instance of ActiveDirectoryClient in my application.
1
2
3
4
5
// Instantiate an instance of ActiveDirectoryClient.
Uri serviceRoot = new Uri(serviceRootURL);
ActiveDirectoryClient adClient = new ActiveDirectoryClient(
    serviceRoot,
    async () => await GetAppTokenAsync());
The first parameter is pretty straight forward where serviceRoot is just the Graph API endpoint for my directory.
The second parameter is using a lamda expression to wire up the function delegate to another method in my class called GetAppTokenAsync which I’ll get to shortly.
I am intentionally leaving out the 3rd parameter as it is beyond the scope of what I want to do in this post and as you can see from the method signature, this is ok; it will just be initialized to null.
The GetAppTokenAsync method is in my code and is tasked to do whatever is necessary to get an access token from Azure AD. This is where the Azure Active Directory Authentication Library (ADAL) comes into the picture. As you can see, it really is simple. I’m creating an authentication context for my directory, creating a credential to use to authenticate with, authenticating with Azure AD and getting an access token, and then returning the token which is just a long cryptic string.
1
2
3
4
5
6
7
8
9
10
11
12
13
14
15
16
private static async Task<string> GetAppTokenAsync()
{
    // Instantiate an AuthenticationContext for my directory (see authString above).
    AuthenticationContext authenticationContext = new AuthenticationContext(authString, false);

    // Create a ClientCredential that will be used for authentication.
    // This is where the Client ID and Key/Secret from the Azure Management Portal is used.
    ClientCredential clientCred = new ClientCredential(clientID, clientSecret);

    // Acquire an access token from Azure AD to access the Azure AD Graph (the resource)
    // using the Client ID and Key/Secret as credentials.
    AuthenticationResult authenticationResult = await authenticationContext.AcquireTokenAsync(resAzureGraphAPI, clientCred);

    // Return the access token.
    return authenticationResult.AccessToken;
}
Now, for my simple application, since I’m using the Client ID and Key/Secret to create a credential for authenticating and acquiring an access token from Azure AD, I will not be prompted to authenticate as was the case in earlier posts in this series. If I wanted to access the graph using the identity of the user running my application, then I would have configured the application with a Delegated Permission to access the directory instead of an Application Permission as I showed earlier. In doing so, I would also use a different overloaded version of the AcquireTokenAsync method to perform the authentication and retrieve the access token.
The point I want to be clear on here is that what I’m showing you is just one of many ways to acquire an access token from Azure AD. As an exercise, I encourage you to take a look at the many overloaded AcquireTokenAsync methods to get an idea of what is possible.
Now that I’m able to connect to the graph I will show how we you perform a few operations on the graph.
Lookup a User by their User Principal Name (UPN)
I’ll start with a simple query of the directory. In this series I’ve used a fictitious user named John Doe to demonstrate various concepts. Below is how you could retrieve the User object for John Doe using his user principal name (UPN).
1
2
3
4
5
6
7
8
9
10
// Look up a user in the directory by their UPN.
var upn = "johndoe@cloudalloc.com";
var userLookupTask = adClient.Users.Where(
    user => user.UserPrincipalName.Equals(
        upn, StringComparison.CurrentCultureIgnoreCase)).ExecuteSingleAsync();

User userJohnDoe = (User)await userLookupTask;

// Show John Doe's Name
Console.WriteLine(userJohnDoe.DisplayName);
Add a New User to the Directory
To add a new user to the directory you need to instantiate an instance of the User class and set some required properties as shown in the code below. There are many more properties that you can set for the user, but these are the minimum requirements for adding a user. The AddUserAsync method will write the user object into the directory.
1
2
3
4
5
6
7
8
9
10
11
12
13
14
15
16
17
18
19
20
21
22
23
24
25
26
// Create a new user object.
var newUser = new User()
{
    // Required settings
    DisplayName = "Jay Hamlin",
    UserPrincipalName = "jayhamlin@cloudalloc.com",
    PasswordProfile = new PasswordProfile()
    {
        Password = "H@ckMeNow!",
        ForceChangePasswordNextLogin = false
    },
    MailNickname = "JayHamlin",
    AccountEnabled = true,

    // Some (not all) optional settings
    GivenName = "Jay",
    Surname = "Hamlin",
    JobTitle = "Programmer",
    Department = "Development",
    City = "Dallas",
    State = "TX",
    Mobile = "214-123-1234",
};

// Add the user to the directory
adClient.Users.AddUserAsync(newUser).Wait();
Assign a User’s Manager
The Manager property is defined in the base class DirectoryObject that User derives from. So, when setting the Manager property you need to cast the user back to a DirectoryObject as I’ve shown here. Also, notice that when I update the graph I do so by calling UpdateAsync on the user who is being assigned as the manager and not the user whose Manager property is being set.
1
2
3
// Make John Doe this user's Manager
newUser.Manager = (DirectoryObject)userJohnDoe;
userJohnDoe.UpdateAsync().Wait();
Retrieve a List of Direct Reports for a User
In the previous step I made Jay Hamlin’s manager John Doe. You can see all of John Doe’s direct reports as shown in the following code.
1
2
3
4
5
6
7
8
9
10
11
12
13
// Get a list of John Doe's Direct Reports
IUserFetcher userFetcher = (IUserFetcher)userJohnDoe;
var directReportsTask = userFetcher.DirectReports.ExecuteAsync();
var directReports = await directReportsTask;
do
{
    foreach (IDirectoryObject dirObj in directReports.CurrentPage.ToList())
    {
        var directReport = (User)dirObj;
        Console.WriteLine(directReport.DisplayName);
    }

} while (directReports.MorePagesAvailable);
Summary
In this post I introduced you to the Azure AD Graph API and laid the groundwork for how you can leverage the graph in your own applications. I showed how to add and configure an application in the Azure Management Portal to use the graph and then I introduced you to the Azure AD Graph Client Library. Next, I provided sample code to connect to the graph and perform a few basic operations.
I barely scratched the surface of possibilities that the Azure AD Graph API presents. The Azure AD team has some excellent samples on GitHub that show many more scenarios for using the Graph API and the Graph Client Library in console and web applications. In addition to the samples, the Azure AD Graph Team has some nice blogs for you to learn more about the Graph API and the Azure AD Graph Client Library. Links to these resources are below in the References section. So, I encourage you to go explore the graph of possibilities.

Comments powered by Disqus.