The Azure Redis Cache is a fully managed dedicated Redis cache that can be used to increase the performance of your cloud applications. It is offered in three tiers: Basic, Standard, and Premium with each tier offering various features and capacity you can choose from.
The Azure Redis Cache offers far more capabilities than traditional key/value caches of past cache offerings. In addition to supporting key/value constructs extremely well, Redis Cache brings to the table features that today’s high performing cloud applications demand such as:
- Native support for complex structures like hashes, lists, sets, and ordered sets
- Transaction support for multiple operations against the cache
- Updating cache values without having to retrieve the item from the cache
- Keys with limited time-to-live
- Pub/Sub Messaging Patterns
With performance and features such as this it is no wonder why the Azure Redis Cache is the recommended cache for cloud applications running in Azure. Microsoft still supports some of the cache offerings of the past but the messaging is clear that Azure Redis Cache is the winner going forward.
In this post I will demonstrate how you can use the Azure Redis Cache in your application with an emphasis on some of the features unique to Redis.
Create a Redis Cache
In the Azure portal, search for and select the Redis Cache in the Azure Marketplace. In the New Redis Cache blade, provide a unique DNS name. Next, select the pricing tier (see Figure 1 above for tier choices, the resource group your cache will belong to, and the location. You should strive to select a location that is in the same region as the services that will use the cache for best performance. The DNS name for your cache will be {cache name}.redis.cache.windows.net.
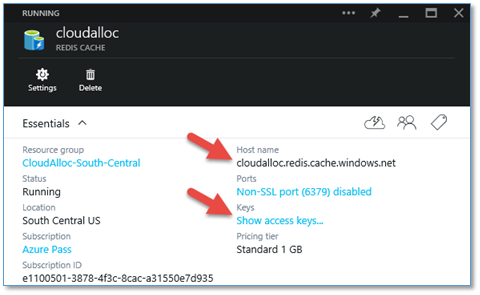
After the cache is created you will need two pieces of information from the Redis Cache blade to start using the cache in your code: the host name and an access key. You can access both of these in the Redis Cache blade as shown here.

Create a client application to use the Redis cache
The code I’m going to show in this section is running in a simple console application. This is intentional to keep the focus on using the Azure Redis Cache. However, the code can be used in any application of your choice after installing the Redis Client Library from Stack Exchange.
Install Redis Client Library
The Redis Client Library I’m using is from Stack Exchange and is available as a NuGet package as shown here.

Before I transition into the code to add/retrieve items to and from the cache, I want to mention another NuGet package that may be useful if you’re developing web applications, which is the RedisSessionStateProvider. This will provide easy support for caching ASP.NET sessions if you need it. However, it is not a topic I’m going to cover in this post.
Connect to the Azure Redis Cach
The ConnectionMultiplexer provides a Connect method used to connect to the cache. It expects a string containing the Redis Endpoint Uri and Access Key. The Endpoint Uri and Access Key were referenced previously using the Azure Management portal and I’ve stored these settings in the app.config file for my application as shown here.
1
2
3
4
5
6
7
8
9
<configuration>
    <startup>
        <supportedRuntime version="v4.0" sku=".NETFramework,Version=v4.5" />
    </startup>
  <appSettings>
    <add key="RedisEndpoint" value="cloudalloc.redis.cache.windows.net"/>
    <add key="RedisAccessKey" value="UydEP<…abbreviated…>IQR2c="/>
  </appSettings>
</configuration>
In my code, I can retrieve these settings to connect to the Redis Cache as shown here.
1
2
3
4
5
6
// Connect to the Redis Cache Endpoint
redisConnection = ConnectionMultiplexer.Connect(
    string.Format("{0},ssl=true,password={1}", redisEndpoint, redisAccessKey));

// Get a reference to the cache
var cache = redisConnection.GetDatabase();
Add items to the Azure Redis Cache
Now that I have my connection established, I can start adding items to the cache. In the code below, I’m demonstrating four things:
- Adding simple key/value pairs to the cache.
- Incrementing an integer value in the cache.
- Adding a hash to the cache.
- Adding a list to the cache.
1
2
3
4
5
6
7
8
9
10
11
12
13
14
15
16
17
18
19
20
21
22
23
24
// Add simple data to the cache
await cache.StringSetAsync("BlogTitle", "Azure Redis Cache");
await cache.StringSetAsync("NumberOfHits", 500);

// Update cache data (without retrieving it first)
await cache.StringIncrementAsync("NumberOfHits", 125);

// Add a Hash to the cache
HashEntry[] userCreds = new HashEntry[]
{
    new HashEntry("username", "johndoe"),
    new HashEntry("password", "p@ssword")
};
await cache.HashSetAsync("User", userCreds);

// Remove items from the cache (if they exist)
string keyBasicTier = "RedisCacheBasicTiers";
await cache.KeyDeleteAsync(keyBasicTier);

// Add a List to the cache
await cache.ListLeftPushAsync(keyBasicTier, "B0");
RedisValue[] basicTiers1to5 = new RedisValue[] { "B1", "B2", "B3", "B4", "B5"};
await cache.ListRightPushAsync(keyBasicTier, basicTiers1to5);
await cache.ListRightPushAsync(keyBasicTier, "B6");
Retrieve items from the Azure Redis Cache
In this section I’ll demonstrate retrieving, and in one case removing, items in the cache. Note that in this section I’m also not using Asychronous API’s as I did in the previous section. This is just to demonstrate that the Redis Cache Client Library supports both synchronous and asynchronous API’s.
1
2
3
4
5
6
7
8
9
10
11
12
13
14
15
16
17
18
19
20
21
22
// Retrieve simple data from cache
Console.WriteLine("BlogTitle: {0}", cache.StringGet("BlogTitle"));
Console.WriteLine("NumberOfHits: {0}", cache.StringGet("NumberOfHits"));
Console.WriteLine();

// Retrieve Hash data from cache
Console.WriteLine("John Doe Credentials:");
Console.WriteLine("\tUsername: {0}", cache.HashGet("User", "username"));
Console.WriteLine("\tPassword: {0}", cache.HashGet("User", "password"));
Console.WriteLine();

// Retrieve List data from cache
var basicTierOptionsCount = cache.ListRange(keyBasicTier).Count();
Console.WriteLine("Number of Basic Tiers: {0}", basicTierOptionsCount);

RedisValue item = cache.ListLeftPop(keyBasicTier);
while (item != RedisValue.Null)
{
    Console.Write("{0} ", item);
    item = cache.ListLeftPop(keyBasicTier);
}
Console.WriteLine();
Observing the application output
The output of the application is show here.

Summary
In this post I introduced some basic principles of the Azure Redis Cache. I showed how to create a cache using the Azure Management portal and then how to use the .NET Client Library from Stack Exchange to add, update, remove, and retrieve items in the cache.

Comments powered by Disqus.