In my previous post I showed how to create an Azure Website that uses Organizational Accounts for authenticating users in Azure Active Directory. In this post, I’m going to go deeper and explore how Visual Studio, the Azure SDK, and Azure Active Directory collectively make building secure LOB web applications for the enterprise a first class experience from the very beginning of the application development process.
The last post was more practical and demonstrated the developer experience when creating a Website that uses Organizational Authentication. So, if you just want to know the how-to, then check out that post. However, if you want to know more about what is happening behind the scenes, then by all means please read on.
The SQL Database Dependency
Recall from my previous post that as I created my Azure Website, I changed the authentication type to use Organizational Accounts. As a result of that decision, I picked up a SQL Database dependency too. Now, having this SQL Database created for me is actually pretty handy. After all, my Website will need a database of some kind, and since an Azure Website targeting the enterprise will be using Organizational Accounts, it is a logical choice for a database. But, why was this necessary? That’s the gist of this post.
First, let’s just revisit what was created in the last post, which was the Azure Website, called AzureADSampleWebsite. And, as part of that process, a SQL Database was created for me too, called AzureADSampleWebsite_db.
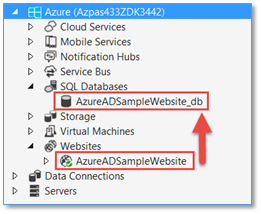
In this database, there were three tables created. Two of these that are critical to supporting the Organizational Authentication type are the IssuingAuthorityKeys and the Tenants tables.
Now, let’s take a deeper look into these tables, what they contain, and how they are used.
The Tenants Table
The Tenants table has just one row with one Id column, which is just a GUID. Each Azure Active Directory tenant has an ID, and for my Azure AD Tenant, it is this.

This ID shows up in a number of places. For example, it is a part of the URL for various endpoints hanging off of my Azure Active Directory, such as the Federation Metadata Document location, the WS-Federation Sign-on Endpoint, the OAuth 2.0 Endpoints, and others that Azure AD supports. You can see these using the Azure Management Portal by clicking on the View Endpoints button at the bottom of the Applications page of your Azure AD.
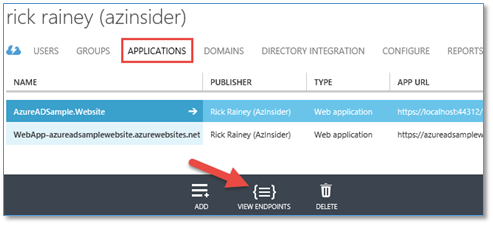
Each of these endpoints shown is unique. However, notice that each one of them has the Azure AD Tenant ID in the URL. Which of these endpoints you would use in your code depends on the type of application you are building and the authentication requirements you are targeting. For my sample MVC Website, the WS-Federation Sign-on Endpoint (2nd shown below) is what is used to sign users in and out.
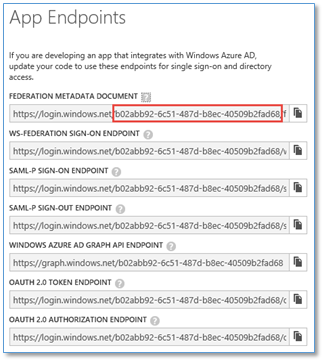
The Federation Metadata Document (1st shown above) is of particular interest for this discussion. Every Azure AD tenant has a federation metadata document that provides certain metadata describing the STS endpoints and other metadata needed by client applications that have externalized authentication to the Azure AD tenant. For example, my sample Website has externalized authentication of users to my Azure AD tenant. This means that after a user has been authenticated, they (the user’s browser) will present a token to my application that Windows Identity Foundation (WIF) will validate and process. One of the validation steps it performs is to insure that the token received is from an STS that I trust. In this case, my Azure AD tenant. This is accomplished by checking the token’s signature using a certificate which can be found in the Federation Metadata Document (shown below).
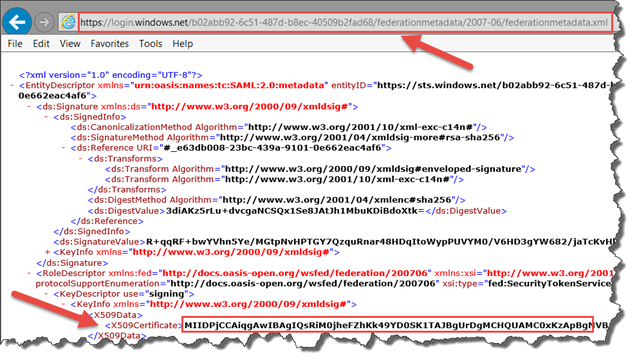
Fortunately I don’t have to write any code to do this token validation stuff. As demonstrated in my last post, this is all handled for me through some nifty tooling automation and WIF, which leads me to the other table that was created in the SQL Database, the IssuingAuthorityKeys table.
The IssuingAuthorityKeys Table
The IssuingAuthorityKeys table also has just one row with one Id column. The value of this Id is the thumbprint of the signing certificate found in the Federation Metadata Document.

You can verify this by grabbing the full certificate value from the Federation Metadata Document and saving it to a .cer file and examining the certificate. That is precisely what I did here. I pasted this value into notepad and then saved it as a .cer file.
Then, from Windows Explorer, I right-clicked on the certificate and selected Open to view the certificate. In the Details tab, I scrolled down to find the Thumbprint for the certificate. Does this value look familiar? It should. It is the Id in the IssuingAuthorityKeys table.
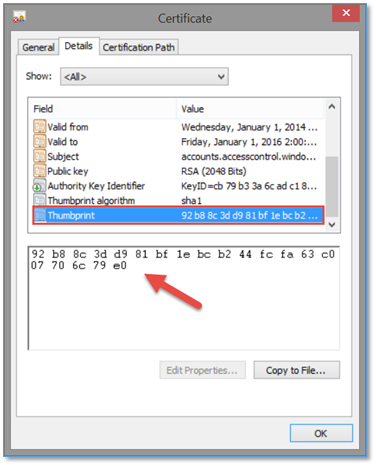
By having the signing certificate thumbprint stored in a SQL Database, it is a relatively trivial task now to retrieve it and pass it on to the WIF modules in my Website so that WIF has what it needs to validate and process tokens presented to my application. Fortunately, I don’t have to write any code to do this either! This code is provided automatically by the Visual Studio ASP.NET Web Application template when Organizational Accounts is selected for the authentication type.
The Code
Choosing Organizational Accounts for authentication using the ASP.NET Web Application template will inject the necessary configuration and code into your project, making this experience simply a pleasure to work with. First, is the web.config file, where you will find all the configuration necessary to support this type of authentication. Second, is the code that is added to your project to read the web.config and retrieve the signing certificate thumbprint from the SQL Database so that WIF can be properly configured at application start-up.
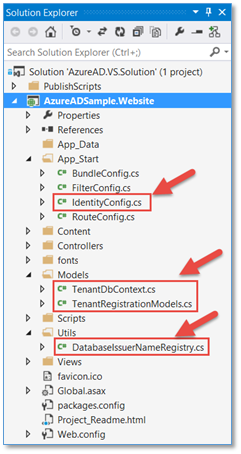
The files shown here are added to the Web Application project to do all the heavy lifting for you. It is not necessary to change a thing. I’m just pointing it out because now that you know what is going on behind the scenes, the code in these files will make sense.
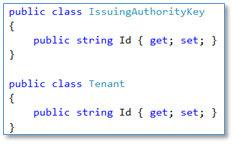
TenantRegistrationModels.cs
This file is the class definitions (models) for the two tables in the SQL Database.
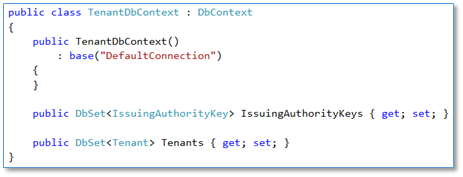
TenantDbContext.cs
This file defines the TenantDbContext class, derived from DbContext. This class is used when querying the tables in the SQL Database. If you have used Entity Framework, then you already know how this works.
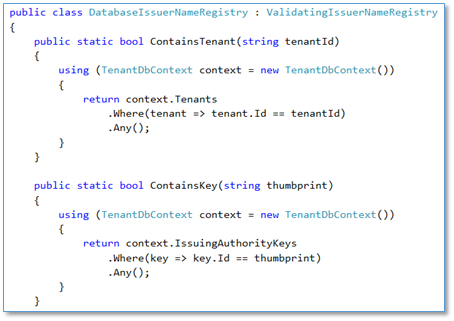
DatabaseIssuerNameRegistry.cs
This file contains a helper class derived from ValidatingIssuerNameRegistry that uses the TenantDbContext (from above) to retrieve the Azure AD tenant Id and signing certificate thumbprint values. There is code in here to do a few other things, but the two methods that get used in the call to IsThumbprintValid are shown here.
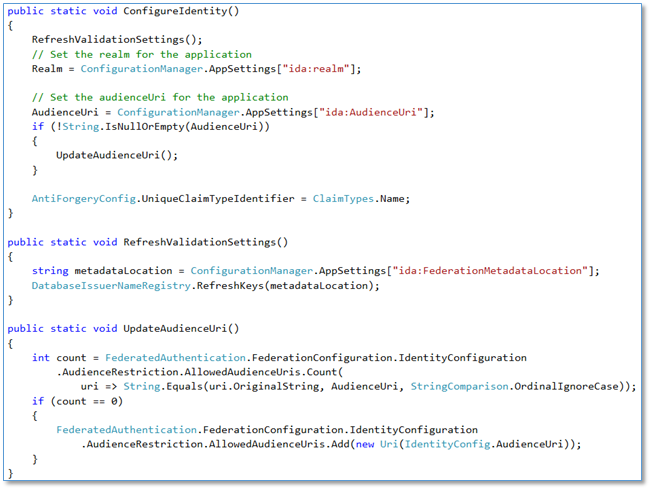
IdentityConfig.cs
This is where everything above gets kicked off. In particular is the ConfigureIdentity method, which is called from the Application_Start method in the Global.asax file to bootstrap the configuration at start-up. Notice that RefreshValidationSettings references the Federation Metadata Document endpoint (from web.config) and then calls DatabaseIssuerNameRegistry.RefreshKeys to add or update the keys (thumbprint) for the Azure AD Tenant. This is where the Tenants table and the IssuingAuthorityKeys table get the values I discussed earlier.
Summary
In this post, I really just scratched the surface on the amount of automation that the tooling provides in this scenario. There is more that comes into the picture when publishing the website to Microsoft Azure. I briefly mentioned it in my last post. Personally, I appreciate the experience provided by the platform and tools because it wasn’t that long ago when some of this had to be done manually. And having an understanding of what is going on is important should you ever want to change things up. Hopefully this post has provided that.

Comments powered by Disqus.