
The Azure Resource Manager (ARM) is the service used to provision resources in your Azure subscription. It was first announced at Build 2014 when the new Azure portal (portal.azure.com) was announced and provides a new set of API’s that are used to provision resources. Prior to ARM, developers and IT professionals used the Azure Service Management API’s and the old portal (manage.windowsazure.com) to provision resources. Today, both portals and sets of API’s are supported. However, going forward you should be using ARM, the new API’s, and the new Azure portal to provision and manage your Azure resources.
Note: At the time of this writing there are still a few resources that are not yet available in the new Azure portal and therefore must be managed in the old portal.
To understand how ARM works it is essential that you have an understanding of what a resource and a resource group is in Azure. So, I’ll talk about these concepts first and then highlight some benefits ARM brings to the Azure platform. In the last section of this post I will discuss tools you can use to work with ARM.
Resources and Resource Groups
A resource is something you provision in your Azure subscription and always belongs to a resource group. For example, a SQL Database, Web App, Storage Account, Redis Cache, Virtual Machine, IoT Hub, and HDInsight are all examples of a resource.
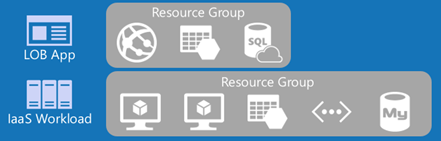
A resource group is a logical grouping of resources that support a particular application or workload. For example, you may have a line-of-business (LOB) application that is comprised of a Web App, Storage Account, and a SQL Database. Another example could be an IaaS workload that is comprised of a pair of virtual machines contained in a virtual network with a MySQL database for data. In the latter example, a storage account is also required to store the virtual hard disks (VHD’s) for the virtual machines. A visualization of what a resource group would look like for each of these scenarios is shown here.
The resources you include in a resource group generally should be those that have the same management lifecycle. Using the LOB App as an example, suppose you have a web development team that manages the Web App and the Storage Account. And suppose that a separate DBA team manages the SQL Database and the underlying server. In this scenario it might make sense for the SQL Database (and the server) to be in a separate resource group that that the DBA team manages. In which case, the resources for the LOB App would span multiple resource groups as shown here.

Resource Providers
The resources in your resource groups are created and managed by resource providers. Each resource has a resource provider that knows how to manage and configure the resource. Architecturally, this is a big change in Azure because it means that new resource types can be developed and exposed through a single management pane (ie: ARM) rather than having resource specific API’s which is the case for the old service management API’s.
Bring it all together
So far I’ve talked about ARM, the ARM API’s, Resource Providers, Resource Groups, and Resources. The Resource Groups and Resources exist in your Azure Subscription. ARM and the Resource Providers used to provision resources are an integral part of the Azure platform. After you authenticate to your Azure subscription, you can invoke the API’s of ARM. A loose architecture of how all this comes together is shown here.

Benefits of Azure Resource Manager
There are many benefits of ARM that the original Service Management API’s (and old portal) could not deliver. Some of the benefits that are top-of-mind for me are described below.
Declaratively provision resources
ARM provides us a way to describe resources in a resource group using JSON documents. Using the LOB App resource group example from above, with ARM, I declare in a JSON document the three resources (Web App, Storage Account, SQL Database) that I want ARM to create in the resource group. In the JSON document I also describe the properties for each of the resources such as the type of storage account, size of the SQL Database, and settings for the Web App, to name just a few. The advantage here is that I am able to describe the environment I want and send that to ARM to make it happen.
Smarter and faster provisioning of resources
Before ARM, you had to provision resources independently to support your application and it was up to you to figure dependencies between resources and accommodate for these in your deployment scripts. For example, to provision a virtual machine, you had to know to create the storage account first and then create the virtual machine because the virtual machine needs the storage account to store it’s VHD’s. ARM, on the other hand, is able to inspect the resources you are telling it to provision and figure out what the resource dependencies are and provision the resources in the order required to ensure all resources are provisioned successfully.
ARM is also able to figure out when it can provision resources simultaneously. For example, to create a virtual machine requires that a virtual network and storage account exist first. However, ARM is able to figure out that there is no direct dependency between the storage account and the virtual network and therefore will provision those two resources simultaneously before provisioning the virtual machine. This means faster provisioning of all the resources described in the resource group.
Resource Groups as a unit of management
Before ARM, the relationship between resources (ie; a web app and a database) was something you had to manage yourself. This included trying to compute costs across multiple resources to determine the all-up costs for an application. In the ARM era, since the resource group containing the resources for your application are a single unit of deployment, the resource group also becomes a unit of management. This enables you to do things like determine costs for the entire resource group (and all he resources within), making accounting and chargebacks easier to manage.
Before ARM, if you wanted to enable a user or group of users to manage the resources for a particular application, then you had to make them a co-administrator on your Azure Subscription. This meant that those users had full capability to add, delete, and modify any resource in the subscription, not just the resources for that application. With ARM, you are able to configure Role Based Access Control (RBAC) for resources and resource groups, enabling you to assign management permissions to only the resource group for only the users that need access to manage it. When those users sign-in to Azure they will be able to see the resource group you gave them access to but not the rest of the resources in your subscription. You can even assign RBAC permissions to individual resources if you needed to.
Idempotent provisioning of resources
Before ARM, automating the provisioning of resources meant that you had to account for situations where some, but not all, of your resources would be successfully provisioned. Using the virtual machine example again, if your storage account was provisioned successfully but your virtual network failed to provision correctly, then you had to write compensating code to handle that situation or handle it manually, neither of which is ideal. With ARM, when you send it the JSON document describing your environment, ARM knows which resources already exist and which ones do not and will provision only the resources missing to complete the resource group.
Tools
The Azure portal is a great way to get started using Azure Resource Manager with nothing more than your browser. When you create resources using the Azure portal (portal.azure.com) you are effectively using ARM. This is fantastic and visually appealing. However, it is not scalable. Eventually you will need to write a deployment template that describes all the resources you want ARM to provision. And to be scalable you will need to automate the deployment. You could start with something from the Azure Quick start Templates but at some point you will likely need (or want) to build your deployment template from scratch. For this, Visual Studio and PowerShell are the two tools I strongly recommend and I explain why in this section.
Visual Studio
The ultimate tool in my opinion is Visual Studio with the Azure Tools installed. When it is time to write your ARM deployment templates, you will find that Visual Studio and the Azure Tools delivers an amazing experience that includes JSON intellisense in the editor and a JSON outline tool to visualize your resources. Writing ARM deployment templates is not a trivial task. Just go take a look at some of the quick start samples on GitHub and you will see how big and complex these can be. By using Visual Studio and the Azure Tools, you will be able to create deployment templates from scratch in a matter of minutes.
If you don’t have Visual Studio you can download the free version here. After you have Visual Studio installed, download and install the Azure Tools. A version of the Azure Tools SDK is available for VS 2013 and VS 2015. The Azure Tools provides an Azure Resource Group project template to get you started as shown below. In subsequent posts I’ll be demonstrating how to use this project template.

PowerShell
The project template I mentioned in the previous section generates a PowerShell deployment script that can be used to send your deployment to ARM in an automated manner. The script uses the latest Azure “RM” Cmdlets that you can download and install from here. Most of the code in the deployment script handles uploading artifacts that ARM may need to deploy your environment. For example, if your deployment template describes a virtual machine that needs a DSC extension to add additional configuration to the VM after Azure has created it, then the DSC package (zip file) would need to be generated and uploaded to a storage account for ARM to use while it is provisioning the VM. But, if you scroll down past all that to the bottom of the script file you will see two commands in the script (shown below).

The first command, New-AzureRmResourceGroup, simply creates the resource group using a resource group name that you provide.
The second command, New-AzureRmResourceGroupDeployment, pushes your deployment template and parameters for the deployment template to ARM. After ARM receives the files, it starts provisioning the resources described in your deployment template.
A workflow diagram of how these tools are used to deploy an environment using Azure Resource Manager is shown here.

Summary
In this post I introduced Azure Resource Manager and highlighted some important advantages it brings to the platform. Then I concluded by introducing a couple of tools you should consider using to author your deployment templates. In future posts I will show how to use the tools to build environments using Azure Resource Manager.
Comments powered by Disqus.