
In my last post I introduced some basic concepts about Azure Active Directory and ended with a review of the protocols and application endpoints that are used to build applications protected by Azure AD. In this post I will continue by talking about developing Web Applications and Web API’s protected by Azure AD using Visual Studio 2013.
Before I get into the developer experience of building a Web Application or Web API protected by Azure AD using Visual Studio, I want to quickly pick up where I left off on the previous post and talk about the portal experience of adding an application to your directory. The experience is extremely simple and prompts you to make only four choices as shown below, two of which require very little thought.
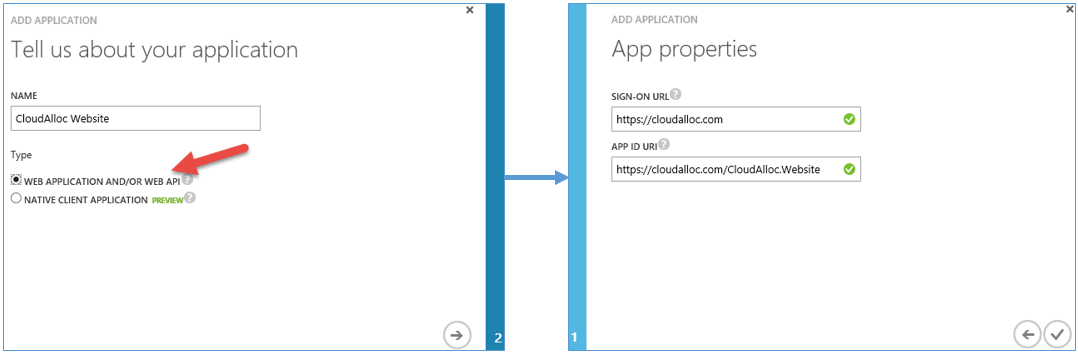
Here is a quick description of the four prompts.
- The name of your application. This can be any name you want and is simply how you will identify the application in your Azure Active Directory.
- The type of application. Notice that Web Applications and Web API’s are considered the same type of application as far as Azure AD is concerned. Since this article is about both, that makes this an easy decision.
- A Sign-On URL. This is the URL where users will access your application. There is no verification of this URL so even if the application hasn’t been developed yet the portal will still let you add it.
- An App Id URI. Notice this is a URI and not a URL. This is what Azure AD will use to identify your application when authentication users requesting access to it. It can be practically anything you want as long as it is unique in your directory and a valid URI.
Now, click the checkmark and you have registered an application in Azure AD. Is it really that simple? Well, not really. What you have is just enough information at your fingertips to go build the application you just added to your directory. And if you continue down this path I promise you will learn to appreciate the degree of automation that Visual Studio and the Azure SDK provides for you when building Web Applications and/or Web API’s that are protected by Azure AD.
So, let’s develop that appreciation now. :)
Add a web application to Azure AD using Visual Studio
To get started building a web application protected by Azure AD, you must navigate your way through a few new project wizard dialogs. If you do this correctly, you will have a new web application that is also added to your Azure AD and configured properly, resulting in the F5 (Run) experience we’ve become so accustomed to from Visual Studio.
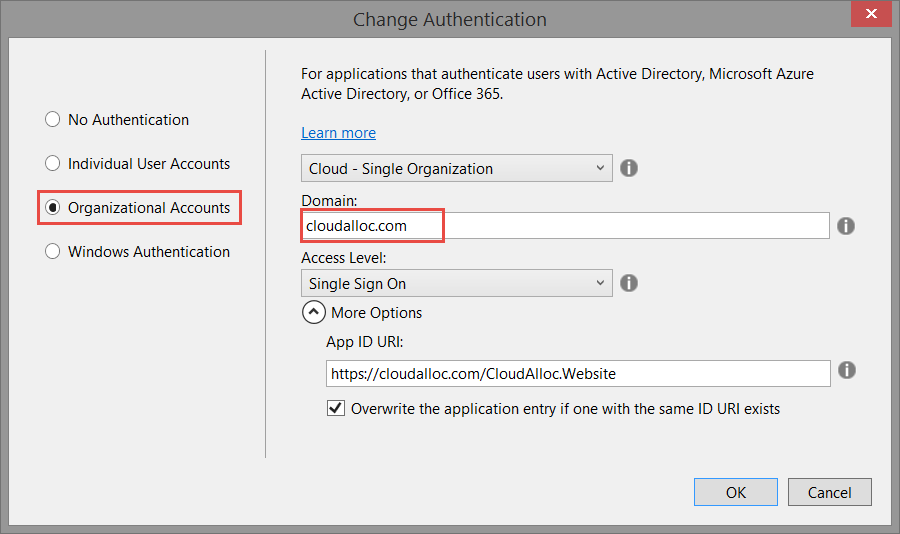
Assuming that you are starting from the ASP.NET Project template for an MVC application and will be hosting it in an Azure Website, the first thing you must do is change the authentication type to use Organizational Accounts (the same as Student or Work accounts mentioned in the last article) and enter the domain (Azure AD tenant) you are externalizing authentication to. In my sample shown here, the Azure AD Tenant is configured with a custom domain otherwise it would be <tenant-name>.onmicrosoft.com.
The next change you must do is specify an existing Azure SQL Database Server to use with your application or create a new one. The reason why this is required is because the code that is added to your project by the ASP.NET project template when using Organizational Accounts requires it.

These are the only two changes you would have to make to successfully create a web application and add it to your Azure Active Directory using Visual Studio. If you prefer a step-by-step experience that walks you through every dialog and more, then please see Authenticating with Organizational Accounts and Azure Active Directory. And if you are interested in further understanding the SQL Database dependency I mentioned above, then see Deep Dive: Azure Websites and Organizational Authentication using Azure AD.
The application produced by the ASP.NET template uses Windows Identity Foundation (WIF) in the .NET Framework to take care of authenticating users accessing the application. WIF provides the implementation of protocols such as WS-Federation that an application like this uses to authenticate users. It handles redirecting unauthenticated users to the correct sign-in (and sign-out) URL for their realm, verifying the signature of the SAML token issued to the client after successfully authenticating, managing session tokens and cookies for the client, extracting claims about the user from the token, and putting these claims in the principal object of the current thread. Most of this functionality is implemented in two HTTP modules that WIF provides, which are the WSFederationAuthenticationModule and SessionAuthenticationModule. Visual Studio takes care of adding these in the web.config as shown here.
1
2
3
4
5
6
<system.webServer>
  <modules>
    <add name="WSFederationAuthenticationModule" type="System.IdentityModel.Services.WSFederationAuthenticationModule, System.IdentityModel.Services, Version=4.0.0.0, Culture=neutral, PublicKeyToken=b77a5c561934e089" preCondition="managedHandler" />
    <add name="SessionAuthenticationModule" type="System.IdentityModel.Services.SessionAuthenticationModule, System.IdentityModel.Services, Version=4.0.0.0, Culture=neutral, PublicKeyToken=b77a5c561934e089" preCondition="managedHandler" />
  </modules>
</system.webServer>
Visual Studio also adds the configuration necessary to insure that session security tokens can be used in a web farm type of environment across multiple machines. This is absolutely critical in situations where you have an Azure Website, Cloud Service or Virtual Machine configured with multiple instances hosting your web application. Otherwise, users would have to re-authenticate every time they landed on a different instance or be bound to a single instance throughout the entire session – neither of which is good for scale. This powerful feature is achieved by removing the default token handler that uses the Data Protection API (DPAPI) and replacing it with a token handler that uses a common machine key available to all instances as shown here. And again, this is taken of for you by the template. If you want to know where that key is and how it comes into the equation see the “deep dive” link I mentioned earlier.
1
2
3
4
5
6
7
8
9
10
11
12
13
<system.identityModel>
    <identityConfiguration>
      <issuerNameRegistry type="CloudAlloc.Website.Utils.DatabaseIssuerNameRegistry, CloudAlloc.Website" />
      <audienceUris>
        <add value="https://cloudalloc.com/CloudAlloc.Website" />
      </audienceUris>
      <securityTokenHandlers>
        <add type="System.IdentityModel.Services.Tokens.MachineKeySessionSecurityTokenHandler, System.IdentityModel.Services, Version=4.0.0.0, Culture=neutral, PublicKeyToken=b77a5c561934e089" />
        <remove type="System.IdentityModel.Tokens.SessionSecurityTokenHandler, System.IdentityModel, Version=4.0.0.0, Culture=neutral, PublicKeyToken=b77a5c561934e089" />
      </securityTokenHandlers>
      <certificateValidation certificateValidationMode="None" />
    </identityConfiguration>
  </system.identityModel>
Another important element in this section of the configuration is the <issuerNameRegistry> element. This is the class that has been added to your project that WIF will use to validate the SAML tokens presented to the web application. You can find it in the Utils folder of your project.
Stepping out of the WIF configuration for a moment, if you look in the <appSettings> section you will find some settings that should look familiar.
1
2
3
4
5
6
7
8
9
<appSettings>
    <add key="webpages:Version" value="3.0.0.0" />
    <add key="webpages:Enabled" value="false" />
    <add key="ClientValidationEnabled" value="true" />
    <add key="UnobtrusiveJavaScriptEnabled" value="true" />
    <add key="ida:FederationMetadataLocation" value="https://login.windows.net/cloudalloc.com/FederationMetadata/2007-06/FederationMetadata.xml" />
    <add key="ida:Realm" value="https://cloudalloc.com/CloudAlloc.Website" />
    <add key="ida:AudienceUri" value="https://cloudalloc.com/CloudAlloc.Website" />
  </appSettings>
The first is the ida:FederationMetadataLocation. Recall from the last post that this was the first endpoint listed that is unique to my Azure Active Directory. In this metadata document is a massive amount of information about my directory tenant in Azure AD, including the public key that is used to validate tokens. The ida:Realm is used when unauthenticated users are redirected to Azure AD to sign-in and the ida:AudienceUri is that unique identifier in Azure AD that I mentioned at the very beginning of this post. So, where do these appSetttings get used? Go look in App_Start\IdentityConfig.cs – another class added to your project by the ASP.NET template.
Are you starting to appreciate all the intricate WIF configuration necessary to make a web application secure with just a few clicks? There is so much more that I don’t have space here to get into. So let me end this with just one more element in the configuration you should at least be aware of, which is the <system.identityModel.Services> element as shown here.
1
2
3
4
5
6
<system.identityModel.services>
  <federationConfiguration>
    <cookieHandler requireSsl="true" />
    <wsFederation passiveRedirectEnabled="true" issuer="https://login.windows.net/cloudalloc.com/wsfed" realm="https://cloudalloc.com/CloudAlloc.Website" requireHttps="true" />
  </federationConfiguration>
</system.identityModel.services>
This configuration applies specifically to the WSFederationAuthenticationModule that I mentioned earlier. Notice the issuer property which should also look familiar. Recall from the last post that this was the second endpoint listed that is unique to my Azure Active Directory and is where users sign-in and sign-out of the web application.
Add a Web API application to Azure AD using Visual Studio
To get started building a Web API application protected by Azure AD using Visual Studio, start with the same ASP.NET project template but this time choose Web API as shown here.
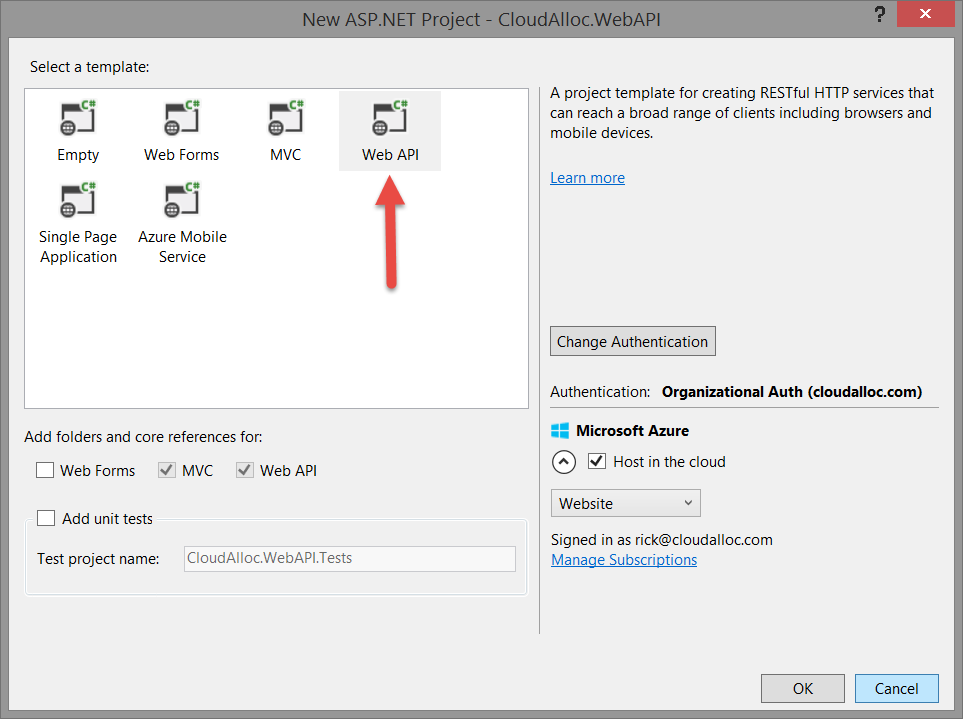
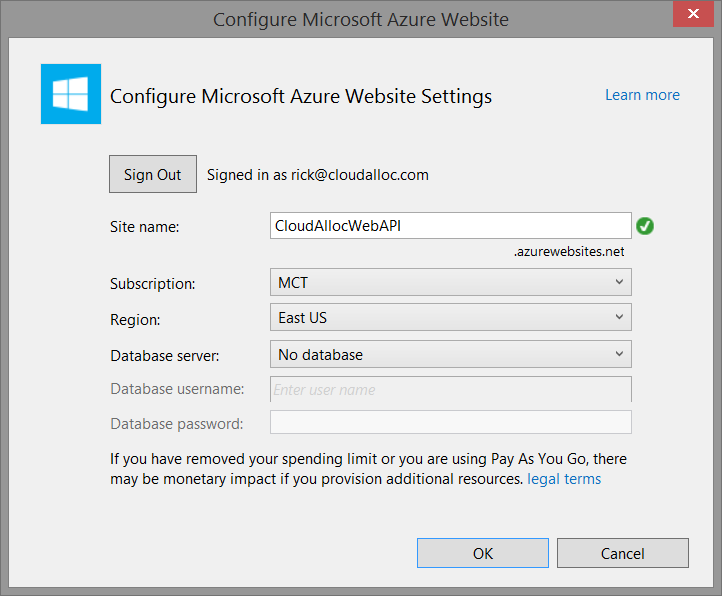
The rest of the experience is the same as for web applications with one very important difference – the Web API project has no requirement for a SQL Database. Now, you may want to have a SQL Database linked to your Web API, but just understand that the project template in this case does not emit any code in your project that absolutely requires it. So, you’re free to choose the No database option if you like as shown here.
The application produced by the ASP.NET template in this scenario uses Microsoft Open Web Interface for .NET (OWIN) Components to take care of authenticating users accessing the application. OWIN is still relatively new and is essentially a specification that defines a standard interface between .NET web servers and web applications. Microsoft’s OWIN Components (aka project “Katana”) provide an open source implementation of the OWIN specification with goals of being portable, modular, and lightweight.
The application in this scenario uses OAuth 2.0 to secure the Web API’s (REST API’s) and therefore uses the OAuth 2.0 application endpoints in Azure AD that I mentioned in the first post in this series. The implementation also takes advantage of the JSON Web Token (JWT) format that is much lighter than the SAML token format we saw previously.
Unlike WIF, OWIN is not a core component of the .NET Framework 4.5 stack. Instead, it is delivered to your project through a set of Nuget packages as shown below, consisting of the community owned and run Owin package (Owin.dll) and several Microsoft Owin Components that provide the implementation of the OWIN specification.
1
2
3
4
5
6
7
<package id="Microsoft.Owin" version="2.1.0" targetFramework="net45" />
<package id="Microsoft.Owin.Host.SystemWeb" version="2.1.0" targetFramework="net45" />
<package id="Microsoft.Owin.Security" version="2.1.0" targetFramework="net45" />
<package id="Microsoft.Owin.Security.ActiveDirectory" version="2.1.0" targetFramework="net45" />
<package id="Microsoft.Owin.Security.Jwt" version="2.1.0" targetFramework="net45" />
<package id="Microsoft.Owin.Security.OAuth" version="2.1.0" targetFramework="net45" />
<package id="Owin" version="1.0" targetFramework="net45" />
The Owin package contains the IAppBuilder interface which standardizes the startup process for the application. I’ll come back to this interface shortly.
The web.config for this project is far less verbose and essentially comes down to just a couple of appSettings that link back to the application registration in Azure AD.
1
2
3
4
5
6
7
8
9
<appSettings>
  <add key="webpages:Version" value="3.0.0.0" />
  <add key="webpages:Enabled" value="false" />
  <add key="ClientValidationEnabled" value="true" />
  <add key="UnobtrusiveJavaScriptEnabled" value="true" />
  <add key="ida:Tenant" value="cloudalloc.com" />
  <add key="ida:Audience" value="https://cloudalloc.com/CloudAlloc.WebAPI" />
  <add key="ida:ClientID" value="024e16d8-639b-4de3-b57c-e4066473e7c9" />
</appSettings>
The ida:Tenant and ida:Audience have the same meaning as previously discussed. The ida:ClientID is a unique identifier for the application in Azure AD and is used if/when the Web API accesses other applications in Azure AD. We will see this used a lot in the next couple of posts in this series. That’s basically it for the configuration!
Let’s turn attention now to the code, which essentially comes down to two files being added in your project: Startup.cs and Startup.Auth.cs as shown here.
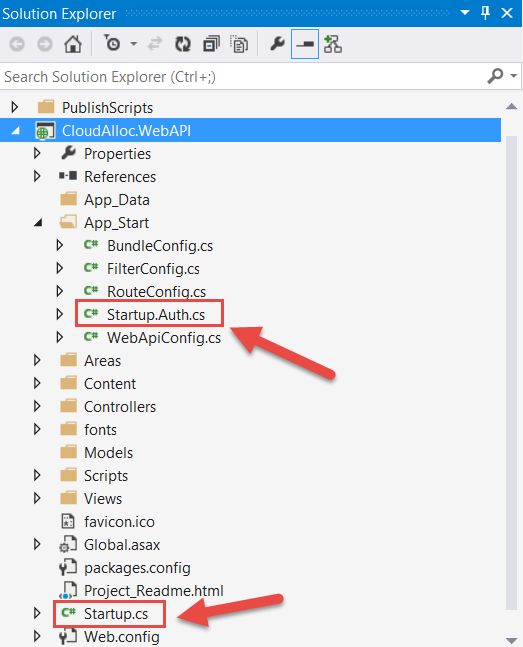
Startup.cs provides the class name and method signature that “Katana” applications look for to configure the Microsoft OWIN components. The Configuration method takes an IAppBuilder interface which if you recall, is the interface defined in the Owin.dll.
1
2
3
4
5
6
7
8
9
10
11
12
using Owin;

namespace CloudAlloc.WebAPI
{
    public partial class Startup
    {
        public void Configuration(IAppBuilder app)
        {
            ConfigureAuth(app);
        }
    }
}
The Configuration method simply calls the ConfigureAuth method in the Startup.Auth.cs file that was added to the project that in turn adds the Azure Active Directory JWT Bearer Token middleware to the application’s HTTP request pipeline as shown here. Notice that it is here where the two appSettings in web.config are pulled in the configuration.
1
2
3
4
5
6
7
8
9
10
11
12
13
14
15
16
17
18
19
20
21
22
23
using System;
using System.Collections.Generic;
using System.Configuration;
using System.Linq;
using Microsoft.Owin.Security;
using Microsoft.Owin.Security.ActiveDirectory;
using Owin;

namespace CloudAlloc.WebAPI
{
    public partial class Startup
    {
        public void ConfigureAuth(IAppBuilder app)
        {
            app.UseWindowsAzureActiveDirectoryBearerAuthentication(
                new WindowsAzureActiveDirectoryBearerAuthenticationOptions
                {
                    Audience = ConfigurationManager.AppSettings["ida:Audience"],
                    Tenant = ConfigurationManager.AppSettings["ida:Tenant"]
                });
        }
    }
}
The bearer token middleware simply means that any party in possession of a token (a “bearer”) can use it get access to the resource (the Web API endpoints in this case) as defined in the OAuth 2.0 Authorization Framework specification.
Just like in the Web Application scenario, this Web API project has all of these details implemented for you and the application is automatically registered in Azure Active Directory. Unlike the Web Application scenario, you cannot just press F5 to run it in your browser. This is a Web API project that expects you to be the bearer of a JWT token to access the endpoints of the application. I’ll show you how to get that token and use it to access the Web API endpoints in the next post.
Identity in the .NET Framework
Whether authentication of users is accomplished using the WS-Federation or OAuth 2.0 endpoints in your Azure Active Directory, and whether a SAML or JWT token was presented to your application, once your application is invoked you can access all the claims that Azure AD (or the user’s identity provider) issued when the user was authenticated. This is possible because your application is claims-aware and is the case for any .NET application targeting .NET Framework 4.5 or newer.
In a claims-aware application the client’s identity is presented as a collection of claims to the application. And as you know, these claims are delivered via the authentication token that the client received from their identity provider (ie: Azure AD) after successfully authenticating. A claim is a statement about the user that the identity provider can corroborate. For example, my Azure AD can undeniably state that my email is rick@cloudalloc.com. A claims-aware application is one that relies on the claims presented to drive application behavior for the user because it trusts the identity provider it has externalized authentication to. If you have ever heard the term “relying party” or “RP” to describe a claims-aware or claims-based application, that is why – because it relies on the claims presented by the client provided the claims are issued by an identity provider it trusts.
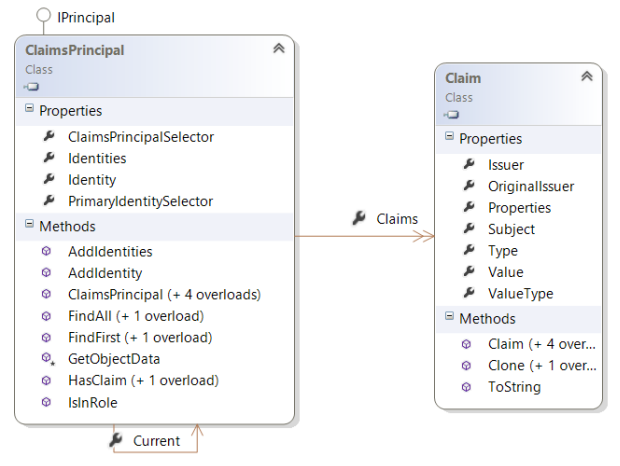
Every thread in a .NET application has a ClaimsPrincipal object that can be used to discover the identity of the client, the identity provider that authenticated the client, and the claims the identity provider included in the authentication token. If you are already familiar with the traditional IPrincipal interface in .NET, then you already know about the principal object on the thread. And as you can see in the diagram below, the ClaimsPrincipal class implements the IPrincipal interface making it compatible with existing code. The ClaimsPrincipal also has a Claims property that you can use to access an individual Claim for a client.
These classes are core components of the .NET Framework starting with version 4.5. You don’t need to download a Nuget package or install an SDK. These classes are as common as System.String and are defined in the mscorlib assembly. So, if you’re targeting .NET Framework 4.5 or newer, then your application is a claims-aware application.
The ClaimsPrincipal class has a static property called Current that will return the ClaimsPrinicipal object for the thread. It is also equipped with some handy methods you can used to find and retrieve the values of claims for a client
The Claim class is used to describe statements about the Subject (or client) that the Issuer can prove. Each claim as a Type that describes the statement, such as the Subject’s Name, Email, PostalCode or any other custom claim that the issuer (or you) has added to the Claims collection. There are 50+ predefined ClaimTypes that are used for the more common claims. However, these ClaimTypes are simply URI’s so you are free to create custom claims for any situation. For example, you may store a profile for a user that includes the make of the car he or she drives and add a claim for that to the Claims collection in a ClaimsAuthenticationManager implementation.
An example of how you can retrieve the Surname claim for a Subject is shown here.
1
2
3
var principal = ClaimsPrincipal.Current;
var surnameClaim = principal.FindFirst(ClaimTypes.Surname);
var surname = (surnameClaim != null) ? surnameClaim.Value : "";
Or, if you prefer to use LINQ you could do something like this.
1
2
3
var principal = ClaimsPrincipal.Current;
var surnameClaim = principal.Claims.Where(c => c.Type == ClaimTypes.Surname).FirstOrDefault();
var surname = (surnameClaim != null) ? surnameClaim.Value : "";
As you can see the object model is extremely simple to navigate to discover and retrieve values of claims.
Summary
In this post talked about the developer experience of building Web Applications and Web API applications that are protected by Azure AD. To recap each of these, a Web Application generated using Visual Studio 2013 is protected by WIF’s implementation of the WS-Federation protocol which is configured via settings in web.config, code that is added to your project, and a SQL Database that stores cryptographic keys. The web application receives a SAML token from authenticated users and WIF validates the token and extracts the claims about the client from the token.
Web API applications generated using Visual Studio 2013 are protected by Microsoft’s OWIN middleware components using OAuth 2.0 and JWT token format. The OWIN components perform similar token validation and also extract the claims from the token.
Finally, I wrapped up with a brief overview of the ClaimsPrincipal and Claim classes and demonstrated how you can retrieve the claims to drive behaviors in your application code.
In the next post, I will cover the Active Directory Authentication Library (ADAL) and show you how you can use it to call Web API’s protected by Azure AD and build native client (non-browser based) applications for Azure AD.
Comments powered by Disqus.